Monday, June 25, 2012

Chapter 1. The Wedding

The focus of my writings is usually not my family, but I have to make an exception.  My youngest son got married this past weekend and I am still on Cloud 9.  To see my son marry the girl of his dreams and to be the happiest I have ever seen him, made my heart sing. 

The wedding weekend (who celebrates for only one day anymore?) was centered arounbd our summer home in the mountains.  It started with the rehearsal dinner (or as we like to call it, the Welcom Dinner) at a local restaurant.  I decided that this was the best time to unveil "THE CHUPPAH".  No one had seen it before except my husband and the almost 100 women at my quilt guild!  So it was a surprise for everyone.  It also gave me the opportunity to explain how meaningful it is in the Jewish marriage ceremony.

The bride and groom

Whenever you have an outdoor event, the big elephant in the room is the weather.  We tried not to talk about a PLan B, thinkging a positive attitude would keep bad weather away.  The days before the wedding, it was stinking hot and there was a threat of thunderstorms.  But it tuned out to be one of the most beautiful days ever.  It had rained a bit the day before and that cooled it off.

As MOTG on the wedding day, my list was short. First, I directed my son, Roger, and his buddy Scott, on the hanging of the flags in the yard. Loren and I had made the 150 flags during their visit on  Memorial Day weekend. 


While we were setting up the yard, my DH was doing one of the things that he loves to do - teaching a child to fish:

My great nephew's first fish  (Don't you love that red hair?)

My second job was to set up the chuppah. My DH and I had a plan that we had been working on for 2 weeks.  We thought it was a great plan.  (Tomorrow's post will give all the details of how it was set up with some close-ups.)  We even had  a plan to deal with the wind, anchoring the chuppah to the dock so that it would not act as a sail.  But wind can be mighty. It took a bunch of us and a bit of adjusting to make sure that the chuppah did not end up in the lake.  Even the Rabbi got involved.

Thankfully it did not blow away before the ceremony.

Rabbi Hyman is a family friend.  He has known my son since he was 12.  Currently the rabbi at Temple B'nai Israel in Easton, MD, he drove over 4 hours to perform the ceremony.  He then turned around and drove back home to perform another wedding in MD the next morning.  We love him and he made the ceremony so meaningful and personal.  At one point he stepped outside of the chuppah to talk to all the guests about the symbolism and what it means in the Jewish religion.  Roger wore the tallit that we bought on our trip to Israel.

Before the ceremony, we were talking about  some other items we brought back from Israel.  One of them was a handmade mezuzzah that we had not mounted yet.  It has a scroll inside with a handwritten prayer that blesses your house.  So the coolest thing was the Rabbi said, where is it?  I'll hang it for you.  OMG  Did he mean that? 
Yes he did! And he blessed it too.

After the ceremony, we all headed to a restaurant/hotel in the town of Hawley, called The Ledges.
There are multi-level decks with a view  of a waterfalls.  The bride designed the tablescapes and they were gorgeous. 


On one of the decks was the band. 

The first dance.

 I think I talked non-stop during the Mother/Son dance because I wanted to forget that everyone was watching us.


The bride bought the cake topper on etsy.  It fit the woodsy theme perfectly.
And the cake was delish.  I waited all night for a piece.

A friend of the bride's family decorated the car.


I am so excited for this couple to begin their journey together with a lifetime of love and happiness.
2 sons + 2 wonderful wives = happiness

Chapter 2. - The Chuppah
Details to follow tomorrow.

Wednesday, June 20, 2012

Wednesday's Wanderings #25 - We're Almost There

I have been sewing away on the chuppah or the wedding canopy for my son's wedding.  I finally finished it this week.  My husband and I also worked out how it will be suspended over the couple and the rabbi during the ceremony.  Next Wednesday I will share it all, but I can't spoil the surprise. 

The first step in my Chuppah Project was to involve the families and friends of the couple.  I cut out leaves from green batik fabric.  I mailed them to families and friends with a pen and a request for them to sign a leaf and perhaps add good wishes.  I also had the guests at the bridal shower do the same. At this point I wasn't even sure what the design would be, but I knew it would have leaves.

When I did start to think about the design, I wasn't getting excited about all those green leaves.  I thought the design would be a bit dull.  So as you can see below, I added other colors to jazz it up.  After I finished the chuppah, I had some leaves left over.  I didn't want to throw out the extra leaves or put them on a shelf and save them  for who knows what.

I decided to use them up and create something unique. 


I used the leaves "as is" for the bottom 6 petals and blanket stitched it down.  For the remaining six petals, I folded a leaf in half and fused it to itself and cut out a new shape.  They are only stitched down in the center, leaving the inner petals 3-D.

The wedding is in 3 days.  I am starting to get excited instead of apprehensive.  If you have been the Mother of the groom, I think you will understand.  I can't wait to share everything.  I'm warning you now that next week, if you decide to come back and visit, make a cup of tea, sit down and check out the details of the chuppah and the wedding story.  It will be a long post.


Saturday, June 16, 2012

Interview With Barbara Persing

The speaker at our guild's June meeting was Barbara Persing. Barbara has a new book that was just published called "Listen To Your Quilt".  (I love the quilt on the cover.)


 Barb is also a member of our guild.  What I find so amazing that this Spring 3 of the members of Calico Cutters Quilt Guild have had books published - Barb, Lisa O'Neill ("Sliver Quilts") and moi (as Miss Piggy would say).  To me, this shows the power of belonging to a guild.  Guild meetings become a place to empower, encourage and inspire each other.

"Listen To Your Quilt" is all about choosing a quilting design or designs for your quilt.  We can all use this help.  She gives a 4 step process that involves choosing a category for your quilt, a style and an intended purpose.  The last step is choosing the best thread color.  It really helps to simplify  the choice of a quilting design. 

Barbara has a long arm business and she has quilted everything from traditional quilts to art quilts.  She has exhibited and won awards at such nationally prestigious quilt shows as  The International Quilt Festival in Houston. You've got to know that you can learn something from her.
One of her newer pieces created by painting with ink.
She was generous enough to answer a bunch of my questions.
What is your favorite part of quilting? I love designing new quilts and choosing fabrics.  If by "quilting" you mean the actual quilting on my machine... I would say I still love the challenge of deciding on what quilting designs and thread color to use. Then seeing how it all comes together in the finished quilts.
Do you have a favorite color? I don't have a favorite color but I do prefer bright clear colors.
How long have you been making quilts? I have been making quilts for 30 years.
You currently have video lessons on The Quilt Show website. What was it like to film that? I am not comfortable in front of a camera and in the video lessons I have no one to "chat" with. For me that was very hard to do. I didn't feel natural.
Your sister is also a quilter. Is there quilting in your family history? Not so much a quilting history but a sewing history. Our mom taught me and my 4 sisters garment construction. Our mother is an amazing seamstress and she passed her love of sewing onto us. Mary and I are the only quilters but all my sisters sew.
I love your "Sampler". It's the quilt on the cover of your book. How many different hand dyed fabrics are there and how long did it take you to collect them? I bought the hand dyed fabrics as fat quarter bundles because I thought the colors were amazing. I purchased them all at once without knowing what I would use them for. All the bundles were hand dyed by the same company. I believe it was a husband and wife business and they are no longer in business. It was a couple of years before I made the quilt so I had the border fabric hand dyed for me by Dippy Dyes. I needed three yards for the border and I could no longer get the fabric from the original source. So you can see this is the perfect justification for buying fabric because it's pretty. We eventually get around to using it all!
Can you share 3 of your favorite tips? Press and then press some more.
It is always worth it to use good quality fabrics, so support your local quilt shops.
If you are going to put borders on your quilt find a good resource and review the proper technique.

Thank you Barb,  I wish you lots of success with all of your quilt related endeavors,

Wednesday, June 13, 2012

Wednesday's Wanderings #24 - A Study in Perspective


I love how fences delineate the curves of the landscape.  They are an exercise in perspective as well.
These fences segment the pastures for the stables at Ridley Creek State Park.  I have always wanted to put them in a quilt.  Doing this little piece (6 1/2" x 8 1/2") gave me the opportunity to do it in a relatively short period of time.  But one day I still would like to make a larger quilt.


This is the run-in shed for the horses. 
 
and a close-up of the horse.  I made the mane out of wool embroidery thread.
This section of the fence is right along the road that we walk along to enter the walking path at the park. Sometimes Bailey is not attached to her leash (shhhh, don't tell) and she thinks the horses are for her to play with.  As she runs towards the fence, I freak out!  She has not run under the rails yet.

 
A few weeks ago I made a block with my interpretation of the wisteria growing in the park.  Unfortunately they ended up looking more like grapes.

I bought new buttons that were much smaller and lighter in color. 

 
 Now I am satisfied that they look like wisteria.

Sunday, June 10, 2012

Garden Tour Surprise

I was invited to a garden tour at White Horse village, a local retirement community.  I had been stuck in the house for so long sewing away, that I decided it would be a good thing to get me out of the house.  Maybe I would get some good photos for future quilts.  (Quilting is always on my mind.)  I was truly inspired and amazingly surprised by what I saw and I walked away with a new outlook.

It was a beautiful day and my friend Frances, also a quilter, was our resident tour guide.  Many of the residents participated with small and beautiful gardens around their places.  I have a black thumb, so I was mightily impressed.


You don't have to be a kid to have a sense of humor!

Some of the residents invited you inside their places.  We were treated to this lovely Victorian crazy quilt.  Unfortunately it's a little blurry :(

The quilt was in almost pristine condition.  Can you see the date of 1885?
 It was a gift from a friend!

The obligatory spider for good luck.

I took many photos of this quilt, but I am embarrassed to say that most of them were blurry.  It is time for me to buy a new camera with that stabilization feature.

This made me giggle.

I was blown over when I met Frances' friend Helen.  Helen eagerly invited us into her apartment.  My eyes lit up as I looked around her living room that was filled with sculptures.  "Did you do these?"  The questions just popped out of my mouth.  This tiny frail woman had a huge smile on her face when she said "yes".  She used to sculpt with clay, but after moving to White Horse Village, she was convinced to try sculpting with stone - yes STONE.  She had sculptures from marble and alabaster and who knows what other types of stone.  How does an 80 something year old woman carve stone??? I was truly awestruck.

"Spirit Rising" by Helen Hucker

"Preening" by Helen Hucker

"The Odd Couple"  by Helen Hucker

In the clubhouse there was an exhibition of sculptures, one more amazing than the next.  I was so taken with this sculpture:

"Proud Guide And Protector"
I found it so sweet and poignant.  It was done by Lou de Moll, another resident.  He was a painter, but he could no longer paint because he lost his eyesight.  So he took up sculpting and created this   sculpture of another resident, complete with her dog and walker - by feel alone!

This whole experience made me think about a topic on the Quiltart list.  Quilters are chatting about milestones and the dread of turning 50 or 60 or 70.  I am not too far from turning 60 and I do understand the feeling of getting old.  In those photos of our parents or grandparents they were in their 60's and they looked so old.  My mother died when she was 74.  I want to be around to see my yet to be born grandchildren grow up.  I think I'll be a fun and wonderful grandmother. 

So my garden visit turned into so much more.  These warm and wonderful people were CREATIVE!  They embraced life and new challenges. Age is only a number.  The one thing I heard over and over were that they were too busy to fit one more thing into their day. 

Who's retired??


Wednesday, June 6, 2012

Wednesday's Wanderings #23 - Lakeside Quilting

 
I just can't believe it is June already.  This Spring has just flown by, and it will keep flying until after THE wedding of my younger son.  Then I think I will be able to catch my breath.

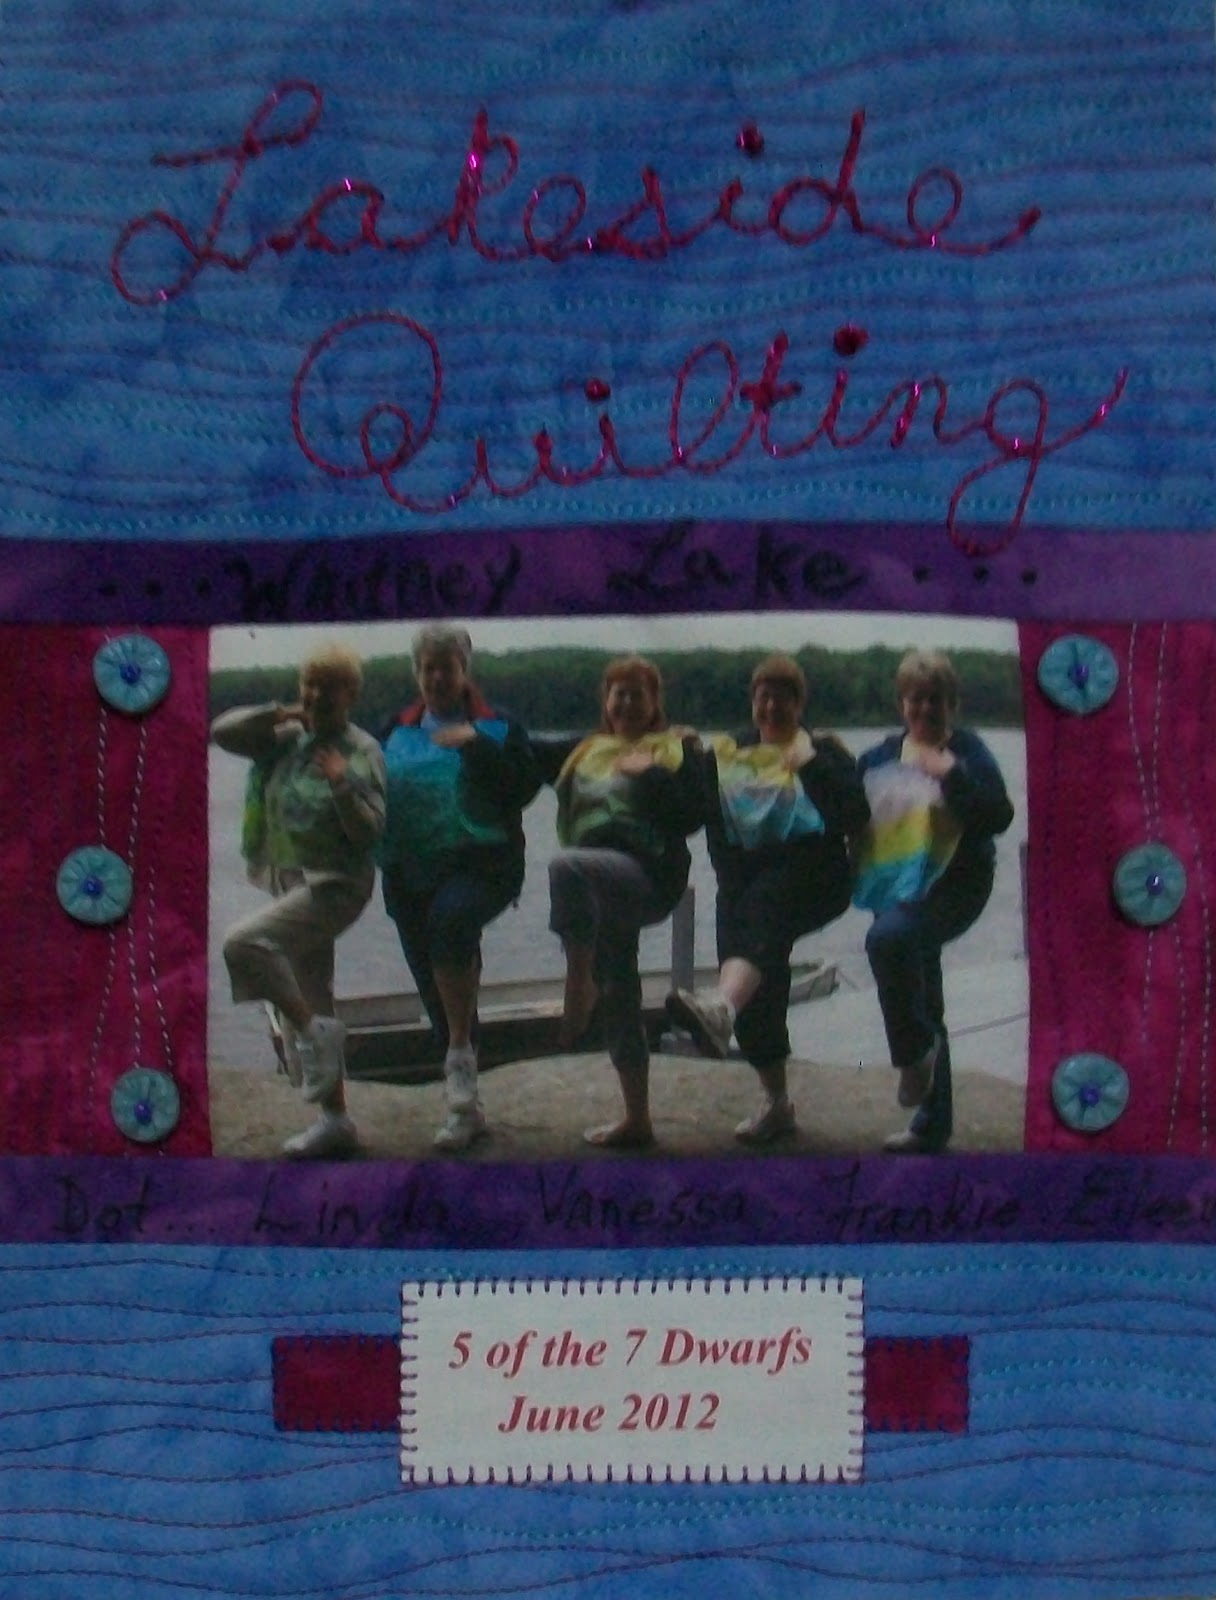
Talk about flying, I am still flying high from my first successful fabric dyeing retreat at our summer home in the Poconos.  I just had to celebrate it with my WW block.  I also want to remember it as an important event in 2012.  I hope it will be the first of many.  The fabrics I used were from my demo of 2 color gradation dyeing. I used Fuchsia and Sky Blue.

 
This group of 5 women call them selves the 7 Dwarfs (2 of them couldn't come).  I call them my guinea pigs because they were the first and it was definitely a huge experiment. The retreat has been named "Lakeside Quilting".  The block started with their photo on the dock.

I added the "Lakeside Quilting" using bobbin work.  It was a little tricky because I had to "write" backwards with my sewing machine.

I first wrote out the words on a piece of paper.

Then I traced it onto a see through water soluble stabilizer.

Positioned and pinned it to the back of the block and stitched from this side.

This is what it looked like after I turned it over and brought my threads to the back.

We also spent a morning making polymer clay embellishments.  The 2 small side borders have a few blue beads that I made once I got home. They are attached using a seed bead.


For those of you new to my blog, my Wednesday's Wanderings are a weekly block about my comings and goings for the year.  At the end of 2012, I will put them together and construct a quilt.  Now that I am almost halfway there, I am more excited than ever.  The idea that I will be able to look at the quilt, which will be wall hanging size, and be reminded of all the places I've been and all the things that I've done, motivates me.

Monday, June 4, 2012

Practical Fabric Dyeing at the Lakeside Quilt Retreat


My 5 Wonderful Guests

A year or so ago, I had an idea to have a quilting retreat at our summer home in the Pocono Mountains.  This was after having many fun getaways with various groups of quilting friends.  My idea was to share  my quilting knowledge with others as well as provide them with a pampered and fun long weekend in a tranquil setting with wonderful food.
One of our delicious breakfasts, a yogurt buffet

Everyone made their own

My 5 guinea pigs, who I met at a guild in Maryland, arrived on Thursday night to spend 3 days with me, eating and dyeing – fabric dyeing that is.  They had chosen to spend the bulk of their time learning various ways to dye fabric. Over the years I have developed methods to do what I call practical dyeing.  These methods are not unique on their own, but they are my distillation of techniques that others have developed.  We did immersion, direct application, 2-color gradation and thread dyeing.  A lot to accomplish. 

Making up the dye stock - lakeside!
Fabric dyeing in baggies.

Batching overnight.
Out of the dryer after rinsing the next morning.


Frankie having the most fun ironing that she's ever had!


16 yds of immersion dyed fabric
Black and white fat quarters "before"


6 sets of 2 color gradated fabric, oriented vertically.
3 color direct application dyeing.

What a beautiful sight!
My methods for immersion and 2-color gradation dyeing can be found by clicking on the tab near the top of this page.  I also list a bunch of resources.

This entire retreat was a trial run.  First I wanted to see if guinea pigs, er I mean students, would enjoy spending time with me and learning what I had to share.  Second, I wanted to see if I enjoyed it.  The resounding results are Yes!!! And Yes!!!.  This experience exceeded the expectations of me and my guests.  Their joy in discovery, became my joy.

 We dyed over 30 yards of fabric in fat quarter increments.  Woo Hoo!

And a good time was had by all!!!!!

 
So I’m going to do it again. I’m thinking Fall 2012.  The colors here in the Fall are breathtaking.  If there is a group of 5 or 6 of you that would like to come as a group, let’s talk.  Shoot me an e-mail for more details.