Wednesday, September 14, 2011

Let's Raise Money For Alzheimer's Research

Calico Cutters Quilt Guild has an annual challenge.  The last few years we have tried to structure it so that not only do we challenge our members but also raise money for a worthy organization. This year we chose the Alzheimer's Art Quilt Initiative (AAQI) as our beneficiary.  The quilts could have any theme, but were supposed to be 8 1/2" x 11".  They were displayed at today's meeting.  People had the opportunity to purchase them with the proceeds going to AAQI.  The remaining quilts will be sent to AAQI and sold at the International Quilt Festival in Houston at the beginning of November. The mini quilts were just amazing.  48 of them all together. Take a look at what some of our talented members created:


Tuesday, September 13, 2011

A Happy Hattie Day

Today was a Happy Hattie Day. What is a Happy hattie Day and what is the origin of that saying?  I have a wonderful friend named Hattie.  Every once in a while she spends the day doing only the things she loves like baking or sewing.  Then she tells me that she has had a Happy Hattie Day.  Since I can't think of an expression using Cheryl to impart that same joy, I now talk about having a fun filled, no strings attached day, as my Happy Hattie Day. 

After  dropping off the ark curtain to be quilted, I decided this was the day.  I have a list of fun projects for just a day like today.  A couple of them I picked up at the bead show. I do love beads.  I decided to make what we quilters would call a scrappy, beaded expansion bracelet.  Lime green is my favorite color, so I gathered green, white, and clear beads and some charms.


This is the expansion bracelet as I bought it.


There is a slot underneath each of the ridges.  There are 3 rows of them.


To make the bracelet you just need a round nosed pair of pliers, head pins and lot and lots of beads.


You attach one bead at a time with a head pin. 
The head pin keeps the bead from falling off the metal wire.  I turned the bracelet on its side and attached the beads a row at a time, continuing in one direction.


Finished in less than a day.

Sunday, September 11, 2011

Ark Curtain Part II

Many of you have been asking me how the ark curtain is coming. For a while I could not answer that question.  Now,  I am happy to say that it is coming along well.  I finished the right half today and put the 2 sides together.
 Ta Da! 
I am thrilled with how it has turned out, so far.  The silk has such a beautiful sheen.
It measures 75" high x 64" wide

 I really needed my deodorant as I squared up each side before I put them together.  I could not have done it without these pattern maker weights.


I don't remember who gave me to me, but I had two.  I knew one day they would come in handy for something.  They are deceptively heavy and they did not budge as I pulled and tugged the curtain.

I made the decision to give it to my friend,  Barb Persing for quilting.  She is an award winning long arm quilter.  I think this piece deserves the type of creative quilting that she can do.

Friday, September 9, 2011

Tips For A Quick Quilt Label

Often I am asked about how I create my labels.  I have gotten pretty good about putting a label on each quilt as I finish it.  It is because I have devised a process that works for me. I prefer to attach the label to the quilt backing before the quilt is quilted, so the label cannot be removed.  It is pretty easy and quick.  It is takes me less time to make a label than write this post.  I use my word processing program (Microsoft Word) and fabric sheets that are pre-treated for putting through an inkjet printer.
Step1.  Print the label
Open your word processing program and type, at the minimum your name, date and where you can be reached just in case your quilt gets lost.  Then add any other info you want included, especially if it is a gift for a special occassion. I also add a photo or piece of clip art.  In this case, I included the tile that inspired this quilt.   About 2 years ago, I decided to add what type of batting is inside.  I can then see how a certain type of batting acts over time.  After printing follow the directions that come with the pre-treated fabric.  Trim the label with a 1/4" seam allowance and remove the backing paper.

Step 2.  Frame out the label
Cut a strip of fabric 1 1/2" wide. Cut 2 strips equal to the measurement of the top and bottom.  Sew it on with a 1/4" seam allowance.  Press open.  Measure the distance from top to bottom and cut 2 strips for the sides.  Sew to the sides and then press open.

Step 3.  Prepare corner triangles
Cut 4 squares that measure 2"x2".

Step 4.  Sew the squares to each corner
Position a square in each corner and sew across it diagonally.

Step 5.  Press open to form the triangles
 aligning the edges of the square with the label.

Step 7.  Trim
Using a roatry cutter and a ruler, open the triangle and trim the fabric 1/4" from the seam.

Step 8.  Prepare For Applique
Cut a piece of paper backed fusible web such as Heat n Bond or Wonder Under the same size as the label.

Step 9.  Fuse
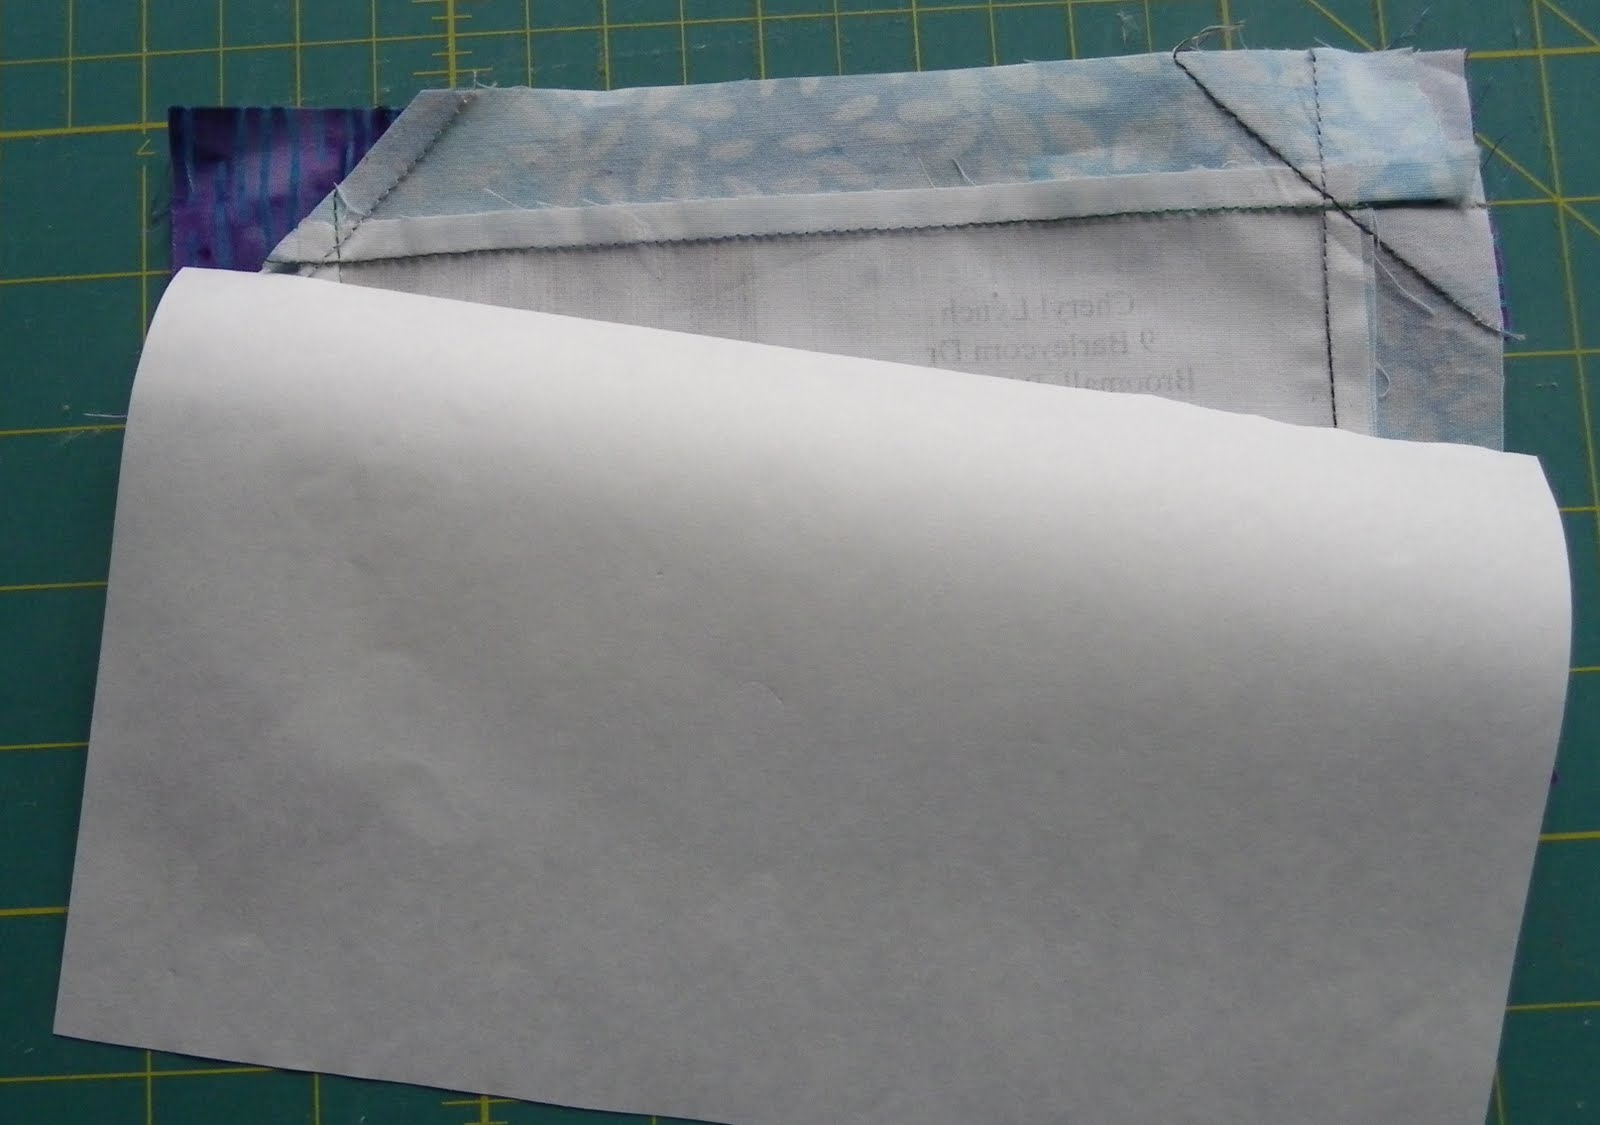
Iron the fusible web to the back of the label following the manufacturer's directions.

Step 10.  Trim
Trim the label so that the side borders measure 1".  This will ensure a good seal on the edges.

Step 11.  Fuse
Remove the paper and fuse the label to the right side of the quilt backing. 

Step 12.  Stitch
Stitch around the label.  I use a blanket stitch.  You can also use a top stitch, zig zag or any type of decorative stitch.

Step 13.  Finished

Thursday, September 8, 2011

And The Winner Is.....

The winner of Volume 2 of Art Quilt Masters is:  Terry Kramzar. 
Terry - Please contact me so Lark can mail you the book.
Congratulations!

Wednesday, September 7, 2011

An Amazing Art Quilt Book Giveaway

Lark Crafts is an amazing book publisher, located in North Carolina.  Each and everyone of their books is full of photos of whatever it is that they are showcasing. They make you drool. Topics of their books range from quilts to handmade books to Judaic crafts.  I must admit that I own quite a few of their books.  And the bonus is that these books, that really are eye candy are so reasonably priced for what you get.
Masters: Art Quilts, Vol. 2: Major Works by Leading Artists

Art Quilts Vol 2 of MASTERS - Major Works by Leading Artists is their newest publication. And it does not disappoint. I wish that I could tell you that I was one of the artists - but I am not.  But what I can tell you is that I am part of the book blog tour to help promote the book.  You may have been to some of the other blogs.  I am near the tail end.  So it is going to be one of your last chances if you want to win a book.  Leave a comment and become a Follower.  Make sure you include a way for me to contact you if necessary.  I will pick a winner on Thursday, September 8th.  I will post the winner here.

There are still a couple more blogs to visit where you can win a book.  Check them out:

9/8 Deborah Boschert-http://DeborahsJournal.blogspot.com
9/9: Brenda Gael Smith-http://serendipitypatchwork.com.au/

Sunday, September 4, 2011

Evolution of a Quilt Design

This is a tile that I brought back from a trip to Barcelona, Spain.  It was a gift from Benedicte Bodard who rescues these tiles from dumpsters.  You can't see it but this 8" tile has about 1" of cement on the back. I brought home 3 tiles from the trip.  To say it was a challenge to transport is an understatement because with the cement the 3 tiles weighed about 20 pounds!  To deal with the airline weight  restrictions, I schlepped it in my carry on.


I was contacted by the magazine, Quilt Life to write an article about using  tiles as design inspiration for quilts.  They requested a quilt that was not in !Quilt Fiesta!, so being the glutton for punishment, I said "Sure, I can do it".  I chose this tile because of its sentimental value and I thought it would give the quilt  a nice diagonal movement. Even though this tile says "craftsmen" to me,  I decided to use fabrics that were jewel tone batiks in a variety of purples, blues and teals.


This was my initial interpretation, but when I multiplied it and created my virtual quilt top, I thought it looked a bit plain. 

So I added the purple designs on the sides. 

I liked it better, but thought the design looked dark (ignoring my horrible photography).


So I added the teal to brighten the dark purple.  It worked.


Since the chosen fabrics made it what I would call a limited scrap quilt, I wanted to try and keep from having too many of the same fabrics touching each other. After I positioned the blocks on my design wall, I used sticky notes on each block to delineate the row and column.  Lately I find myself getting distracted during construction and these location notes help me to keep all the blocks where I intend them to be.


I very rarely buy fabric for the back of my quilts.  I try to use what I have.  This keeps me from having to buy more fabric.  I use up what may be left over from the top.  Sometimes I find myself in a rut always working with the same colors.  When using up these scraps from the current and maybe some previous projects, it forces me to work in other colors.


I am having trouble coming up with a name for this quilt.  If you have any suggestions, I would love to hear.  In the meantime, you'll have to wait to see the finished quilt when it is published, probably in a winter issue of Quilt Life.  It's a great magazine. You'll love it.