Showing posts with label scalloped hem. Show all posts

Monday, January 16, 2017

An Eclectic Life

Being a quilter and a designer is pretty much a solitary life. Don't get me wrong, I have friends, but most of the time I'm in my studio. I'm either at my sewing machine or on my computer. I love to go out and visit quilt guilds to share what I know with other quilters and I try to make lunch/coffee dates with friends to get out of the house. My daily walk is so important to me.
This all changes when I head to Key West. We live in a small place around a plant filled courtyard with a eleven other units. I create and sew while I'm here, but there isn't a day that goes by that I'm not socializing. Just taking Bailey out to do her business, results in multiple conversations. My weekly painting class immerses me in the art community. The quilt shop, The Seam Shoppe, is a 20 minute walk. I'm there at least 3 times a week. We eat out a bunch and my favorite places to eat are located on the water. Here we are at Geiger Key Marina, with my favorite company and a food I only eat down here, blackened fish tacos.
How about Bingo at The Green Parrot, the southernmost bar, to benefit The Studios of Key West?
And instead of walking, Bailey and I head out on a bicycle ride, where we often circumnavigate the island. That sounds far, but it's about 10 miles! This is one of my favorite sights on our ride.
The bicycle becomes my means of transportation. Riding my bike to buy drawing supplies, or groceries or miscellaneous items at the dollar store makes it a very healthy lifestyle.
I'm still sewing and designing and staying active on social media. I'll be vending at QuiltCon in February and need to add some new items to my booth. I found this cute little toddler sundress DIY on a blog called Blooms and Bugs. I added a cute scalloped border using fabric from The Seam Shoppe. Isn't it adorable?
I'm hoping to include a video of how I add scalloped hems with Curvalicious, which will work for skirts, dresses and even pillowcases in my next monthly newsletter. If you haven't received one yet, you can sign up for my newsletter HERE, so you don't miss it.
I was asked to review a Craftsy class presented by Christa Watson on machine quilting. It's called The Quilter's Path: Plan It, Stitch It, Quilt It. It's a basic class packed with a lot of information. Christa talks about thread, walking foot and free motion quilting. I like her attitude that her "quilting is perfectly imperfect!"
While watching the video, I thought about this little paper pieced mini quilt I had just designed and made called "Philly Love".
It was inspired by a Philadelphia iconic sculpture.
I'm in a pink mini swap on Instagram (@CherylLynchQuilts) and this will go to my swapmate. I had some ideas about how I was going to quilt it. It's only 12" square. In the Craftsy class, Christa shared how she quilted a spiral circle with her walking foot. I decided to try her technique. It was easy peasy and I just loved the result.
Here's the good news. You can get Christa Watson's machine quilting Craftsy class for half price by clicking on this link, CRAFTSY.
It's certainly nice to be living outside of my comfort zone, and the beautiful weather sure does help. When you spend a morning videoing roosters walking about town, to send to your grandson, you know it's not Pennsylvania.


Wednesday, August 10, 2016

The Adorable DIY Curvalicious Skirt

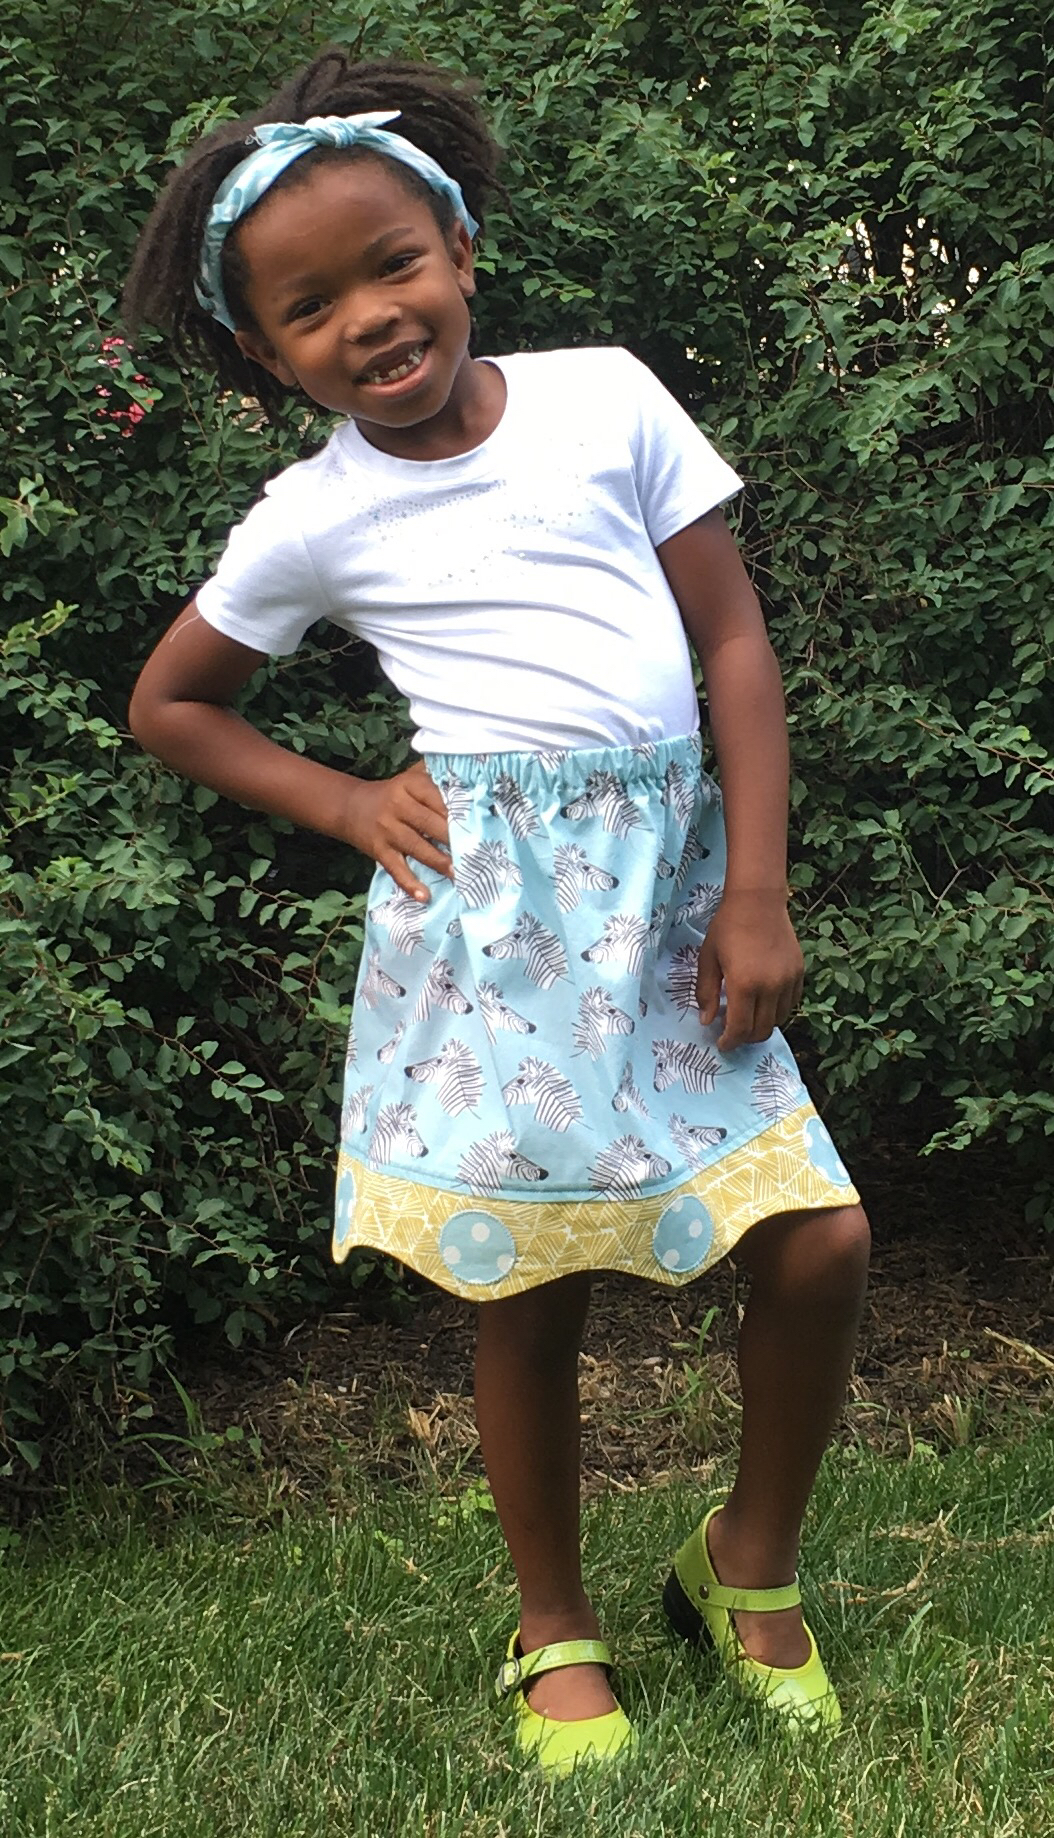
The cuteness of this skirt comes from the scalloped hem made using Curvalicious, the fabric (Hawthorne Threads) and of course the model. Curvalicious is available in my Etsy shop. The model is NOT for sale, however her Mother did tell me that she will rent her out for the cuteness factor - just kidding!!!!!

I consulted a bunch of different size charts for measurments to create the skirt. I compared 6 different charts and I have to say the measurements were all over the place. I was only looking for waist and length to knee measurements. So I will not give measurements based on age or size. I recommend that you actually measure the child. There are only 2 measurements and they are easy to take.

Once you have the waist measurement, it is time to figure out the the amount of fabric needed for the scalloped hem. I take the waist measurement and multiply by 1 -1/2. So if the waist measurement is 22", I would need 33" of fabric for the width of the skirt. However, for the scallops to match at the seam where they are joined, the length needs to be a factor of 6. I would increase that number to 36". Then add 1/2" for joining the seam.

This would be what the calculation looks like for the width of the skirt.

1. Waist in inches x 1.5

2. Increase that number so it is divisible by 6

3. Add 1/2"

For the length of the skirt body, measure to the knee and subtract 1"

You will also need 3/4" non- roll elastic that is 1" shorter that the waist measurement

CUTTING

Cut two strips for the scalloped border, 4" x width of skirt

CUt the skirt body based on the above measurements and calculations

DIRECTIONS - skirt border

1. Place the 2 strips of the border fabric right sides together and fold in half

2. Place Curvalicious as close to 1 edge as possible and cut along the edge with a 28 mm rotary cutter

3. Unfold and pin the 2 strips right sides together. Sew 1/4" from the curved edge.

4. Clip the inner curves

5. Turn right sides out and using something like a bamboo knitting needle, smooth out the curves, press.

6. Cut fusible 2" circles and. Place them with the ruler.

Press in place and carefully open up the border and stitch in place with a blanket stitch. Tie off the threads.

I encased the raw edges when putting the skirt together.

7. Place the border on top of the skirt body, wrong sides together. ( yes, wrong sides together)

8. Stitch with a 1/4" seam allowance

9. Trim the allowance to 1/8"

10. Press this open and then press on the other side

11. Now fold it so the right sides are otgether and stitch with a 3/8" seam allowance.

12. Top stitch down along the seam

DIRECTIONS - skirt body

1. To sew the side seam together, follow the directions above starting with folding the skirt together with wrong sides facing.

2. Prepare for elastic insertion by first pressing 1/2" along the top edge to the inside

3. Fold over 1" and press again

4. Top stitch along the casing from the inside with a matching thread in the bobbin, leaving a 1" opening for inserting the elastic

5. Insert the elastic with a safety pin, being careful not to lose the free end.

6. Overlap the elastic ends and stitch across twice about 1/2" from each other

7. If possible, check the fit first and make any adjustments in the elastic. Stitch the opening in the waistband to close it.

8. Tada! Finished and ready for your own adorable model.

For more ideas for a Curvalicious hem, visit HERE


Saturday, August 6, 2016

Model Shoot

Check this out!

I have been wanting to experiment with a scalloped skirt hem created with Curvalicious. I have designed these sweet skirts with a Curvalicious border, but could I do it as the edge?

The answer is a resounding YES!! It just needed some inner curve clipping and careful pressing.

This project started with fabric from Hawthorne Threads. They are an amazing on line fabric seller that has started designing their own fabric. If you remember, I ordered a yard of 3 fabrics from them from their Zebra Hills collection. It arrived as one piece of fabric. I realized it's because they print the fabric as its ordered. How cool is that?

My first thought was to create a Curvalicious quilt I would have called "Mirror Images" inspired by a drapery panel that I saw at IKEA.

My friend Kelly of Pinkadotquilts often tells me that people want to see our failures as well as our successes. So here's the beginning of my quilt. Iset it aside because it just did not work for me.

It was time to switch directions. When I ordered the fabric, my initial thought was to try the scalloped skirt, so I returned to that idea. I sized it to fit my friend Dina's daughter. Miriam arrived with the perfect patent leather clogs.

The skirt is just too cute - and so is the model. Miriam was a natural and the poses came just effortlessly. She made my scalloped skirt look fabulous and has decided that she will wear it on the first day back to school!

Check out her hair band. It's a square of the polka dot fabric folded and rolled as a bandana.

I will share a tutorial for the skirt in my next post.