

How about one for each holiday/season?
It can be made in 3 sizes and there's only 1 template per size.
You will need:
2- 1/2" D-rings
2- 1/2" D-rings
For the adult size: 1 yd for a one fabric apron
(1 1/4 yd if the fabric is directional and the pocket needs to be cut from one selvage to another.)
(You will need 1/2 yd of another fabric if you are going to make a contrasting pocket and ties.)
Childrens' size: 3/4 yd for a one fabric apron
(You will need 1/4 yd of another fabric for a contrasting pocket and ties.)
Cutting Instructions:
Cutting instructions are given for the adult size. The children's sizes are in parentheses.
Below is the cutting diagram for bot the adult and childrens' aprons. Use this as a guide.
- Cut 2" wide strips for the ties. You will need 3 (4)
- Cut a rectangle of fabric measuring 24" wide x 30" long. (13"W x 20"L)
- For the pocket, cut a strip that measures 8" high x 24" wide. (5" H x 13"W)

Here's a chart summarizing:

These are the only templates you need. It's for cutting out the armpit.

Click on this LINK . Open the template in another screen and you can print it. Double check the size using the ruler as a guide.
Cut out the armhole using the template and orient
it according to the pattern with the fabric folded in half.


it according to the pattern with the fabric folded in half.


Apron Construction:
1. Fold under the top edge of the pocket 1/4". Press.
2. Fold under again, a generous 1/4" . Press.
3. Stitch 1/4" from the edge with a matching thread.
4. Topstitch as close to the edge as possible with a matching thread.
 5. Fold under the bottom edge of the pocket 1/2". Press.
6. Position the pocket on the apron so that the bottom of the pocket is 9 1/2" (4") from the bottom edge of the apron.

6. Position the pocket on the apron so that the bottom of the pocket is 9 1/2" (4") from the bottom edge of the apron.
7. Pin the pocket in place and stitch along the bottom edge, 1/4" from the fold.
8. Topstitch as close to the edge as possible.
9. To make sections in the pocket, stitch from the bottom up about 1/3 of the way in from each edge.
8. Topstitch as close to the edge as possible.
9. To make sections in the pocket, stitch from the bottom up about 1/3 of the way in from each edge.

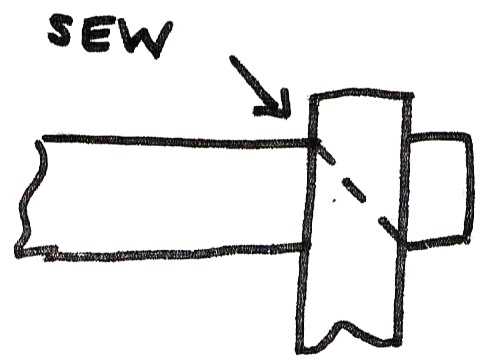
10.Around the entire apron, except for the arm holes, fold under the raw edge 1/4", then fold it under again another 1/4". Press. Sew 1/4" from the edge.
11. Topstitch as close to the edge as possible.
Making the Ties:
Two ties are needed for the apron, 46" and 50" (35" and 39") in length. If the 2" strips you cut are not long enough, you will have to join them.
To achieve the least inconspicuous seam, join the strips at a 45 degree angle. Place the strips perpendicular to each other, right sides together. Sew from the inside corner straight to the outside corner. Trim the seam to 1/4" and press open.
1. Fold under 1/4"to the wrong side at each end of the ties. (you will do this 4 times.)

2. Fold each tie in half lengthwise, wrong side in. Press.
3. Open and then fold each of the raw lengthwise edges to the middle. Press.
4. Fold in half again lengthwise. Press.
5. Following the diagram below, pin the ties to the apron with the arm hole fabric tucked inside each tie, leaving a 24" (20") tail at the waist. (There will be as difference in length at the neck.)

6. Sew the ties to the apron and finish the ties by sewing continuously along the lengthwise edges close to the edge.
7. To add the D-rings:
- Using the shorter of the apron ties, slip on 2 D-rings.
- Fold over 1" of the tie and stitch close to the end. (3X)
- Stitch across the tie as close as possible to the D-rings. (3X)


And now you're ready to cook! Bon Appetit,

ReplyDeleteI love the fabric you chose.I think it would be adorable for little kids doing crafty projects too. I may just know a few....